How To Make Potions In Minecraft
Learn how to make potions in Minecraft with this step-by-step guide. Brew healing, strength, and invisibility potions using a Brewing Stand and ingredients.

Shahrukh Sial is a Gaming Content Strategist at Sparked Host. He identifies his own strategic outlines through deep research to cover game guides, tips, and updates that help players improve their skills and enjoy a better gaming experience.
Potions in Minecraft are magical brews that provide powerful effects to players and mobs. Whether you’re preparing for a boss fight, exploring the depths of the ocean, or simply trying to survive the night, potions can make your life easier or harder if used against you.
In this complete guide, you’ll learn how to brew potions, use potion combinations effectively, and understand everything from awkward potions to lingering potions and beyond.
This guide is designed for both Java and Bedrock Editions and includes all steps, potion types, modifiers, and keywords. Let’s begin your journey into the world of drinkable potions.
Step 1: Gather Supplies From The Nether
Before you can brew potions in Minecraft, you need to venture into the Nether. This dangerous dimension holds the core ingredients required to create base potions and potion reagents. The brewing process begins with collecting:
Blaze Rods
These are dropped by Blazes, found in Nether Fortresses. They are crucial for crafting Brewing Stands and Blaze Powder.
Nether Wart
Found growing on Soul Sand inside Nether Fortresses. It's a vital potion reagent for brewing awkward potions, which are the starting point for most effect potions.
Soulsand (For Farming Nether Wart)
Required to grow Nether Wart in the Overworld. Farming it ensures a steady supply for your potion-making needs.
Step 2: Craft A Brewing Stand
To craft a Brewing Stand:
-
Open your crafting table.
-
Place 1 Blaze Rod in the center of the top row.
-
Place 3 Cobblestone, Blackstone, or Cobbled Deepslate in the middle row.
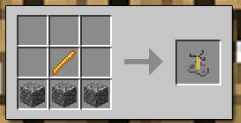
The Brewing Stand is where all potions are created. It's powered by blaze powder, which is also used in potion reagent recipes such as strength potion.
Step 3: Craft Glass Bottles
To brew potions, you need containers. Here's how to craft glass bottles:
-
Smelt sand in a furnace to get glass.
-
Use your crafting table and place 3 glass blocks in a "V" shape (bottom middle and either side of the middle row).
-
This yields 3 glass bottles.
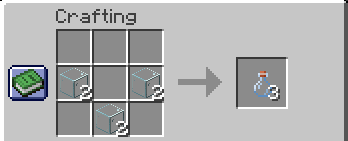
Use the bottles to right-click any water source to get Water Bottles. You’ll use these to create awkward potions and other drinkable potions.
Step 4: Craft Blaze Power
Blaze Powder is used both as fuel and as a potion reagent in some recipes.
To craft blaze powder:
-
Place a Blaze Rod in the crafting table.
-
You’ll receive 2 Blaze Powder.
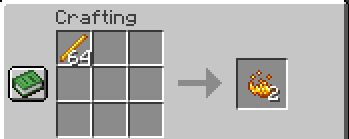
Add blaze powder to your Brewing Stand’s fuel slot to activate brewing. Without this, you can’t brew potions.
Step 5: Make Your Potions
Start by brewing awkward potions:
-
Add blaze powder to fuel the stand.
-
Insert Water Bottles into the bottom slots.
-
Add Nether Wart to the top slot.
You’ll now have awkward potions—the base for almost every effective potion in the game. These awkward potion effect potions can be enhanced or extended with additional ingredients.
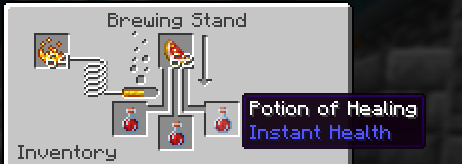
How To Make A Potion Of Healing
-
Ingredients: Awkward Potion + Glistering Melon
-
Effect: Instantly restores 4 health points. This is the only potion that heals instantly, making it a drinkable potion effect often used in battle.
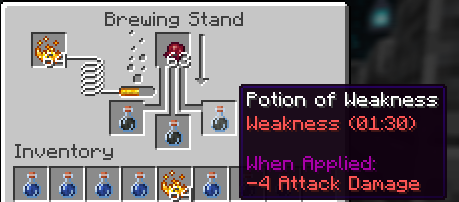
How To Make A Potion Of Weakness
-
Ingredients: Water Bottle + Fermented Spider Eye
-
Effect: Reduces melee attack damage. This is one of the only potion types that doesn’t need Nether Wart. It is considered a negative potion and is used for curing zombie villagers
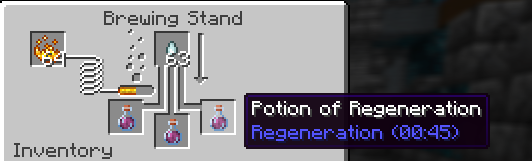
How To Make A Potion Of Regeneration
-
Ingredients: Awkward Potion + Ghast Tear
-
Effect: Gradually restores health over time. This is a purely beneficial potion effect, great for long fights.
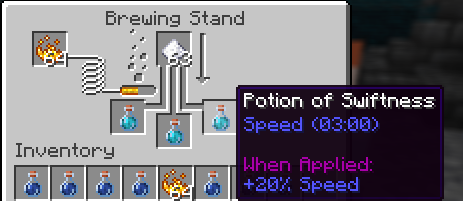
How To Make A Potion Of Swiftness
-
Ingredients: Awkward Potion + Sugar
-
Effect: Increases movement speed. An enhanced potion when combined with Glowstone, or an extended potion when combined with Redstone.
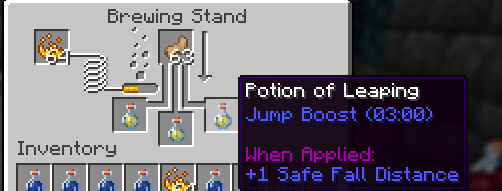
How To Make A Potion Of Leaping
-
Ingredients: Awkward Potion + Rabbit’s Foot
-
Effect: Increases jump height and reduces fall damage. Can be turned into a splash potion brewed with Gunpowder for team use.
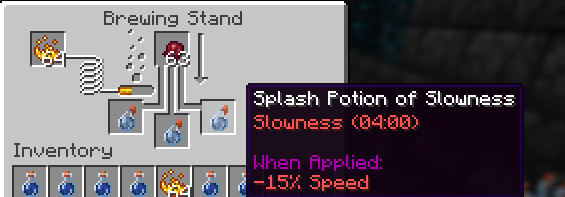
How To Make A Potion Of Slowness
-
Ingredients: Potion of Swiftness or Leaping + Fermented Spider Eye
-
Effect: Slows targets down. This corrupted potion results from inverting a positive potion.
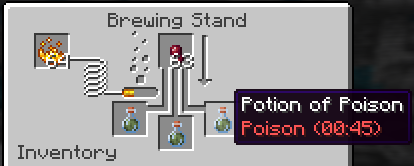
How To Make A Potion Of Poison
-
Ingredients: Awkward Potion + Spider Eye
-
Effect: Slowly damages players or mobs. This poison potion doesn’t kill, but it is great for weakening enemies.
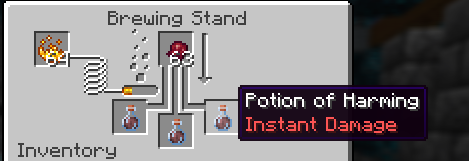
How To Make A Potion Of Harming
-
Ingredients: Potion of Healing or Poison + Fermented Spider Eye
-
Effect: Instantly damages targets. This is a corrupted potion that delivers immediate damage and is considered a harmful potion.
How To Make A Potion Of Fire Resistance
-
Ingredients: Awkward Potion + Magma Cream
-
Effect: Makes you immune to fire, lava, and heat sources. A purely beneficial potion.

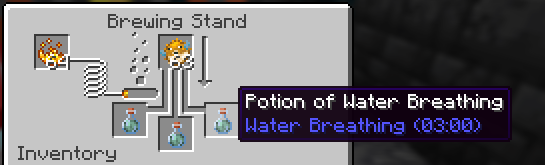
How To Make A Potion Of Water Breathing
-
Ingredients: Awkward Potion + Pufferfish
-
Effect: Allows underwater breathing and keeps your oxygen bar full. Great for exploring ocean ruins.
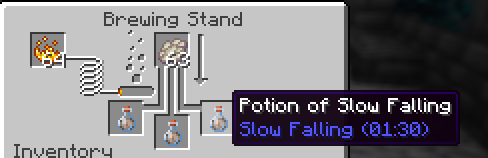
How To Make A Potion Of Slow Falling
-
Ingredients: Awkward Potion + Phantom Membrane
-
Effect: Prevents fall damage and slows your descent. A good option for Elytra users or high-altitude builds.
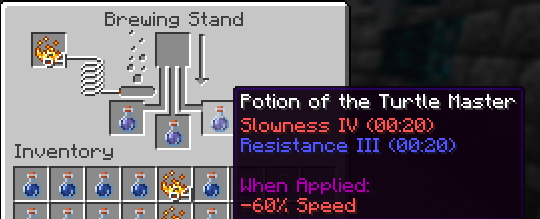
How To Make A Potion Of The Turtle Master
-
Ingredients: Awkward Potion + Turtle Shell
-
Effect: Grants resistance and slowness. The turtle master potion is great for tanking hits, but limits movement speed.
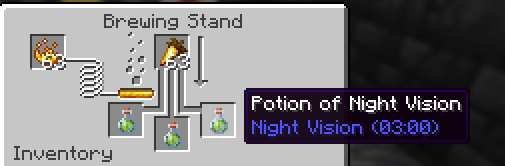
How To Make A Potion Of Night Vision
-
Ingredients: Awkward Potion + Golden Carrot
-
Effect: Makes dark areas look bright. Excellent for mining, exploring caves, or diving.
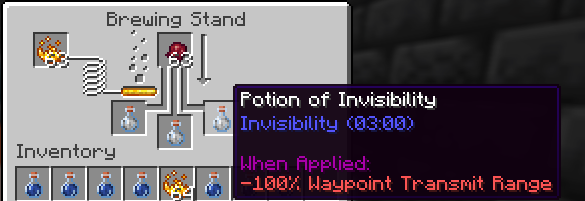
How To Make A Potion Of Invisibility
-
Ingredients: Potion of Night Vision + Fermented Spider Eye
-
Effect: Turns you invisible. This invisibility potion is useful for stealth missions.
Optional Step: Modify Your Potions
You can modify potions to suit your needs:
-
Redstone Dust: Alters potion duration, turning them into extended potions (e.g., 8 minutes instead of 3).
-
Glowstone Dust: Strengthens the effect, creating enhanced potions (e.g., Speed II).
Note: You can’t combine both Glowstone and Redstone due to the same modifier rule.
How To Make A Splash Potion in Minecraft
Add Gunpowder to any brewed potion to make a splash potion brewed for throwing. These potions break on impact and affect nearby players/mobs. Splash water bottles can be used to extinguish flames or hydrate farmland.
How To Make A Lingering Potion in Minecraft
Start with a splash potion, then add Dragon’s Breath. This creates lingering potions that leave an effect cloud on the ground. Lingering potions added strategic uses in PvP and can be turned into area-of-effect traps.
How To Make A Stronger Potion in Minecraft
To make your potion stronger, add Glowstone Dust. This enhances the effect level (e.g., Healing II instead of I). These are enhanced potions but with shorter potion durations.
How To Make A Potion Last Longer in Minecraft
Add Redstone Dust to increase how long a potion lasts. These are known as extended potions and are ideal for exploration (e.g., longer Night Vision or Water Breathing potions).
Conclusion
From collecting blaze rods in the Nether to experimenting with potion combinations, brewing potions is an essential part of mastering Minecraft. Understanding awkward potions, corrupted potion transformations, and how potion duration and strength are modified gives you a big advantage.
Drinkable potions, splash water bottles, and lingering potions all have strategic value. Even mundane potion or thick potion types, while unused in standard recipes, hint at future brewing possibilities and unused potion IDs. Always keep glass bottles handy, or even fill infinite glass bottles, to stay ready.
Whether you’re crafting a strength potion for battle, using a poison potion in traps, or mixing elixir cures for friends, remember that every potion involves precision. And in your Minecraft world, a well-brewed potion could mean the difference between victory and defeat.
Keep experimenting with your Brewing Stand, test the same modifier limits, explore rendering potions unobtainable mechanics, and don’t forget the importance of your base potions potion reagent combinations. Now grab that glass bottle and brew like a pro.