How To Make A Map In Minecraft
Learn how to make a map in Minecraft, including crafting steps, required materials, and how to expand and use maps for navigation and exploration.

Shahrukh Sial is a Gaming Content Strategist at Sparked Host. He identifies his own strategic outlines through deep research to cover game guides, tips, and updates that help players improve their skills and enjoy a better gaming experience.
Picture this: you’ve just spent hours building an awesome fortress in your new world, but now you’re on a long mining trip and can't find your way home. Sound familiar? The massive and beautiful world of Minecraft can be a challenge to navigate, but mastering Minecraft maps makes it simple.
This guide is your ticket to better exploration. We'll walk you through everything you need to know, from crafting your very first locator map to building a grand map wall to proudly display your adventures. Let's make sure you never lose your way again.
How To Craft A Map In Minecraft
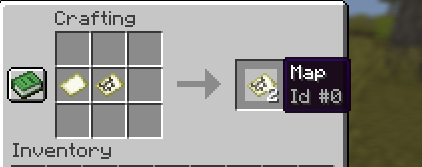
To create a map in Minecraft, you'll need two main ingredients: paper and a compass. You can make this starting map in either Java Edition or Bedrock Edition. The crafting recipe is a straightforward one that most people learn early in survival mode.
Gather Your Resources
-
Paper: You can make this from sugarcane, which grows naturally near water in most biomes. Just find some sugarcane and put it in your crafting table to get paper.
-
Compass: This requires four iron ore to make iron ingots and one piece of redstone dust. Put the redstone dust in the center of the crafting grid and surround it with the iron ingots.
Craft Your Map
Now for the fun part, once you have your compass and at least eight pieces of paper, you can create an empty map.
-
Open your crafting table.
-
Place the compass in the center of the 3x3 crafting grid.
-
Surround the compass with the eight pieces of paper.

This will give you an empty map. It's just a blank slate until you decide to use it! In the Bedrock Edition, you can also enable the Starting Map option in the world settings when you create a new world to get an empty locator map right from the start.
Using The Map
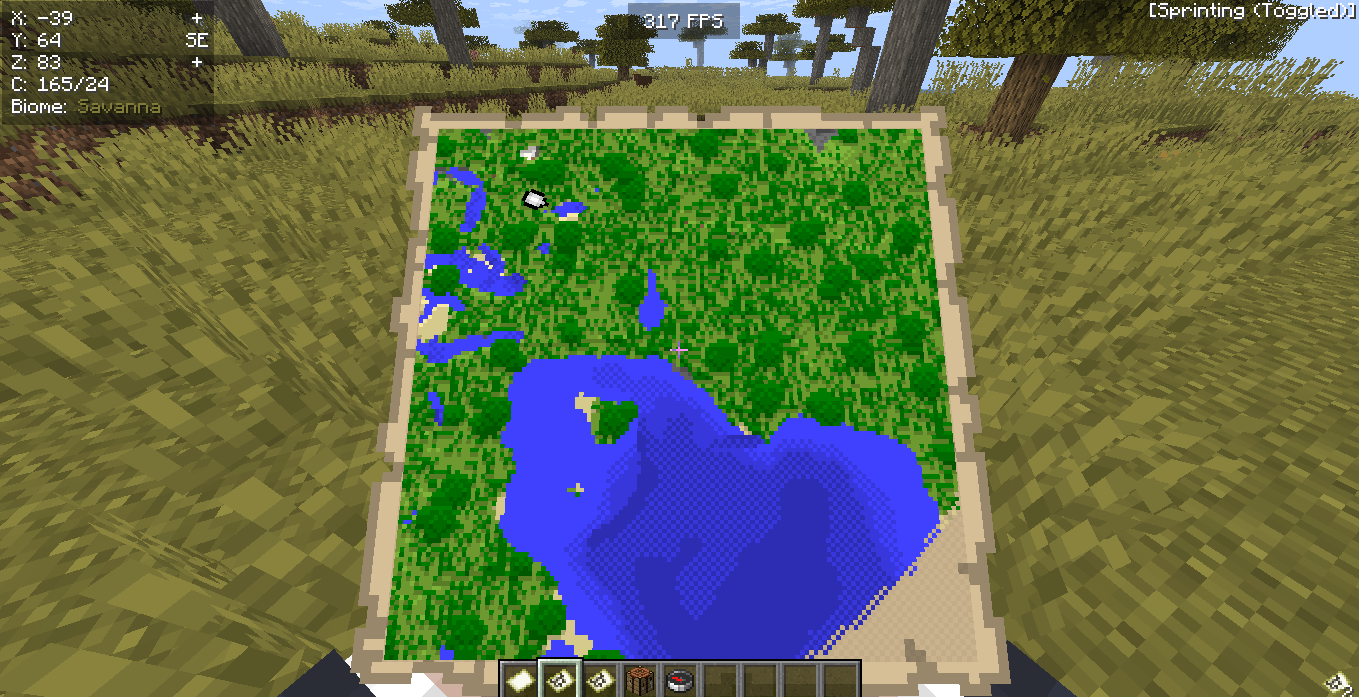
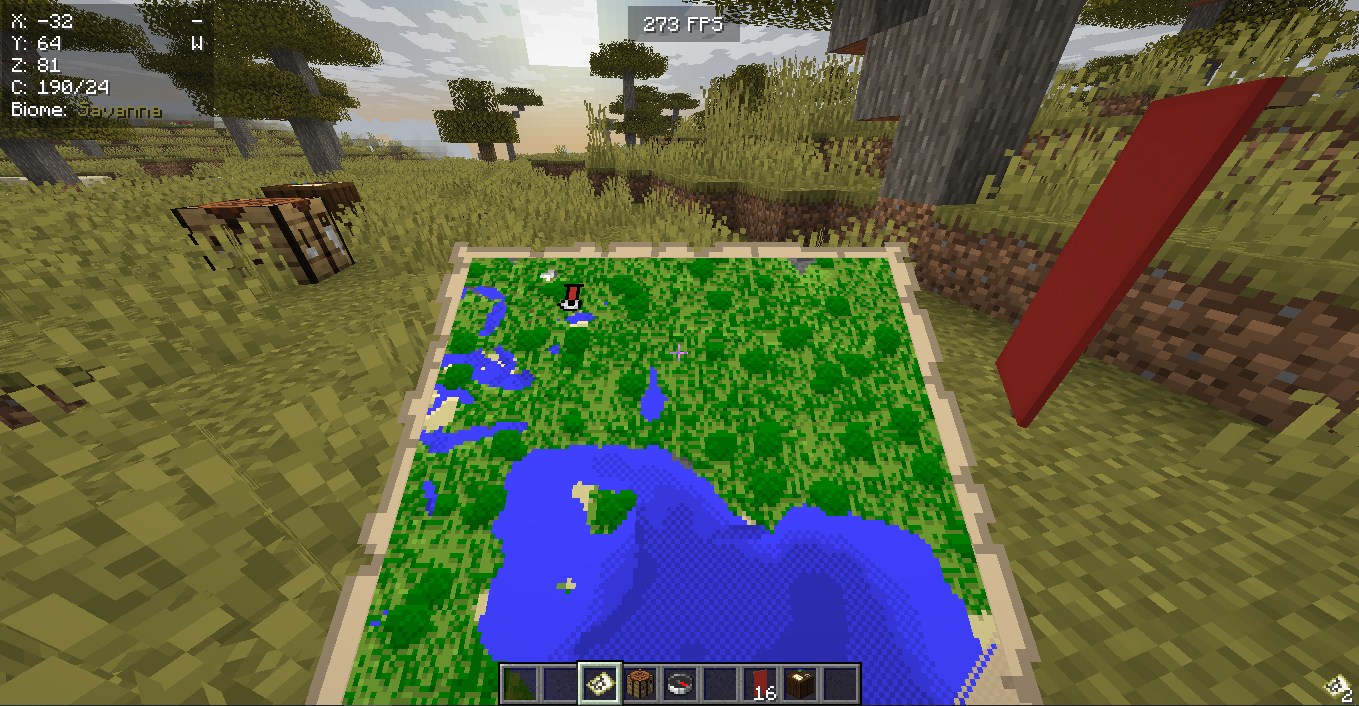
To use your empty map, just hold it in your hand and right-click on your mouse (or use the use button on your controller, like on Nintendo Switch or Xbox). This will create a locator map that shows your current location and fills in as you explore. The map will display a top-down map view of the terrain and buildings around you. On Java Edition, your location is a white pointer, while on Bedrock Edition, it's a white dot.
Alternate Method: Using A Villager
You can also obtain an empty map from a cartographer villager in a village. These villagers are identified by their cartography table job site block. You can trade with them to get an empty map for 7 emeralds. In Java Edition, cartographer villagers may also give players an empty map if they have the Hero of the Village effect. Additionally, these villagers sell other useful minecraft maps, like ocean explorer and woodland explorer locator maps, which can aid your exploration.
Using A Map in Minecraft
Minecraft maps are crafted using paper and a compass and help players with exploration and navigation in the game world. To activate the map, equip the empty map in your hand and right-click to turn it into a locator map. The map will display a top-down map view of the terrain with your current location indicated by a white pointer in Java Edition or a white dot in Bedrock Edition. As you move around, the map will update to show more of the surrounding area.
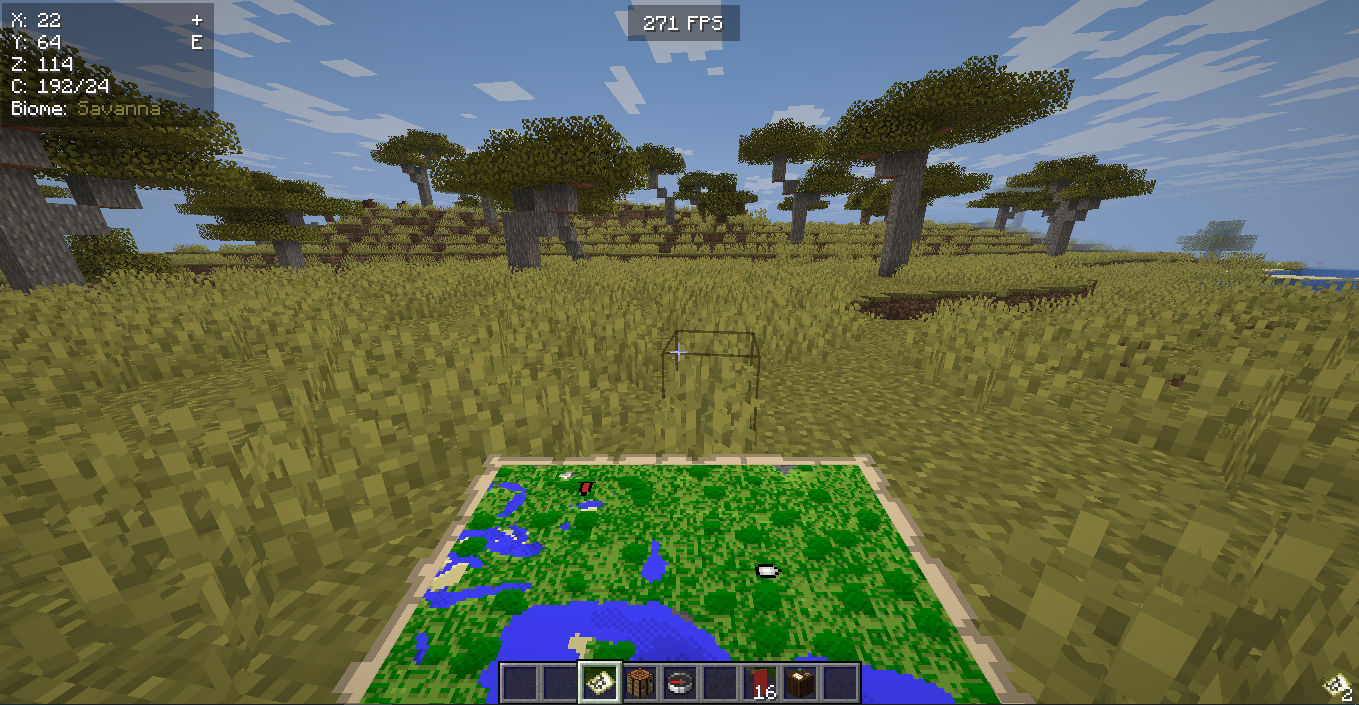
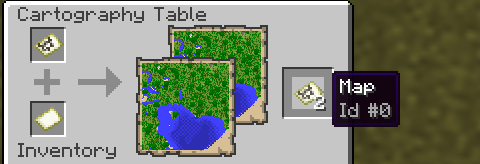
The top of the map always represents North, and the white pointer or white dot indicates your location and the direction you're facing. The size of the white dot indicates how close you are to the mapped area; a larger dot means you’re closer. To expand a map’s scale, you can use a cartography table and add more paper, which allows you to explore a larger portion of the world on a single map at a different zoom level.
For more details on your map, you can mark specific locations by placing a banner and using the map on it. This is an excellent example of a simple way to find your way back to important places.
Customizing A Map in Minecraft
You can create and customize Minecraft maps to fit your needs. Customization is a key part of exploration in the game.
To expand your map and increase its coverage area, simply place the filled map and a piece of paper in a cartography table. If you want to copy a map, you can create a duplicate by placing it with an empty map in a crafting table or a cartography table.
You can also customize your map with banners. To do this, craft a banner and place it where you want to mark a location. It helps if you give the banner a name in an anvil. While holding the filled map, right-click the banner to add a marker. In creative mode, you can further customize your map using mods like WorldPainter and WorldEdit to create custom landscapes, but that's a more advanced form of customization.
Copying A Map In Minecraft
Want to share your map with a friend? Or maybe you want a backup just in case? You can easily copy your map using an empty map.
-
Place your filled map and an empty map together in a crafting table or cartography table.
-
This will create an identical copy of your map.
The cool part is that these cloned maps are synchronized. If you make an update to one, it will show up on all the others. This is super handy if you're playing with friends.
Making A Map Bigger
A map's initial scale is pretty small. To get a bigger map view, you need to zoom out. You can do this with either a crafting table or a cartography table.
-
Using a Cartography Table: Place the filled map in the top slot and one piece of paper in the slot below. The cartography table will give you a zoomed out map. You can repeat this up to four times to get a giant map. This method is very resource-friendly.
-
Using a Crafting Table: You can also put your map in the center of a crafting grid and surround it with eight pieces of paper. This will also give you a zoomed out map.
Adding Markers with Banners
This is one of the most useful map features! You can mark a specific location on your map by using banners.
-
Craft a banner and place it in a spot you want to remember, like your base or a dungeon.
-
Hold your filled map and right-click on the banner.
-
A marker will appear on your map, helping you find your way back.
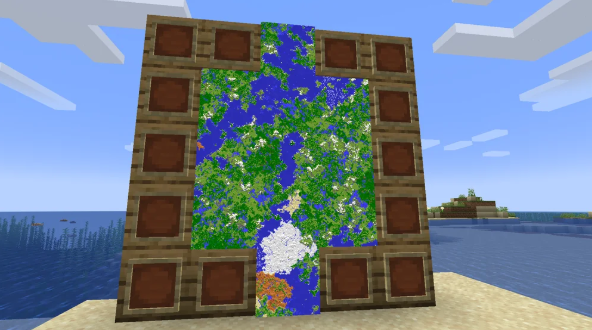
How To Make A Wall Map in Minecraft
A map wall is a fantastic way to display your adventures. You can turn your entire base into a giant map of your world!
-
You'll need an item frame for each map you want to display.
-
Craft a new map and explore the area right next to your existing map.
-
Once the new map is filled in, place it in an item frame next to the item frame with your existing map.
-
Repeat this process with multiple maps until you've covered a huge area.
Advanced Concepts and Edition Details
The Cartography Table's Role
The cartography table is a specialized block that simplifies the process of creating and managing Minecraft maps. Instead of a crafting table, it's the most efficient tool for tasks like zooming out maps to cover a wider area. You can also use it to create synchronized copies of a filled map, which is useful for sharing with friends or making a backup. This block is a central hub for all advanced mapmaking needs.
Your Starting Map
A starting map is the initial map you get to begin your exploration. It's crucial for both survival mode and creative mode gameplay. When you right-click on an empty map for the first time, you generate a locator map that reveals the terrain as you move. In the Bedrock Edition, this is given to players automatically at times, but in the Java Edition, it must be crafted from paper and a compass. This first map is your key to navigating the world.
Understanding Minecraft Maps
Minecraft maps are more than just a navigational tool, they are a visual record of your travels. They can be used in every dimension and are a fundamental part of gameplay, whether you're on a PC playing the Java Edition or on a Nintendo Switch playing the Bedrock Edition. They fill in as you explore, showing a top-down map view of the terrain. The player's location is indicated by a white pointer (in Java Edition) or a white dot (in Bedrock Edition).
The Item Frame for Display
To create a stunning wall display of your exploration, you need to use an item frame. This item allows you to hang a map on a wall for easy viewing. You first explore an area to fill the map, then craft an item frame using sticks and leather. Placing the map inside the frame transforms a plain wall into a visual representation of your world. This is a popular decorating technique, especially in creative mode.
Edition Differences in Gameplay
While the core mechanics of mapmaking are similar, there are subtle differences between Java Edition and Bedrock Edition. The Java Edition features a white pointer on the map to show the player's location, while the Bedrock Edition and its counterpart on the Nintendo Switch use a white dot. Another difference is how you can obtain maps from villagers, as the Hero of the Village effect in Java Edition can lead to a free empty map, a feature not present in Bedrock Edition. These small differences can impact how players approach exploration.
Conclusion
So, to wrap things up, mastering Minecraft maps is a really important skill for any player. It's more than just crafting, though. It's about using tools like the cartography table to make your maps bigger or to copy them, and understanding the differences between the Java Edition and Bedrock Edition. With these tools, you can explore your world without getting lost and even make cool displays of your travels. So grab your paper and compass, and go find your next adventure.