Best Base Locations After the Palworld 1.0 Update
Discover the top 10 base locations in Palworld after the 1.0 update. Optimize your gameplay and find the perfect spot for your adventures! Read more.

Shahrukh Sial is a Gaming Content Strategist at Sparked Host. He identifies his own strategic outlines through deep research to cover game guides, tips, and updates that help players improve their skills and enjoy a better gaming experience.
The Palworld 1.0 full release (launched on July 10, 2026) has completely redefined territory management across the Palpagos Islands. With the maximum character level cap raised to Level 80 and the maximum Palbox infrastructure expanded to Base Level 35, guilds can now unlock a 4th active base slot and deploy up to 50 working Pals at a single camp.
Version 1.0 introduces massive endgame features like High-Pressure Crude Oil Extractors (unlocked at Technology Level 50), new resources like Hexolite Quartz and Soralite Ore, and unique building kits. Because the full launch brings intense, faction-specific endgame raids, choosing large, flat surfaces and leveraging vertical terrain is strictly necessary to prevent worker AI pathfinding glitches and secure your vaults. This comprehensive guide details the absolute best base locations for the 1.0 version, completely updated using the latest source metrics.
#1. Overall Best Base for Late Game
Sakurajima Oil Fields (Coordinates: -646, 270)
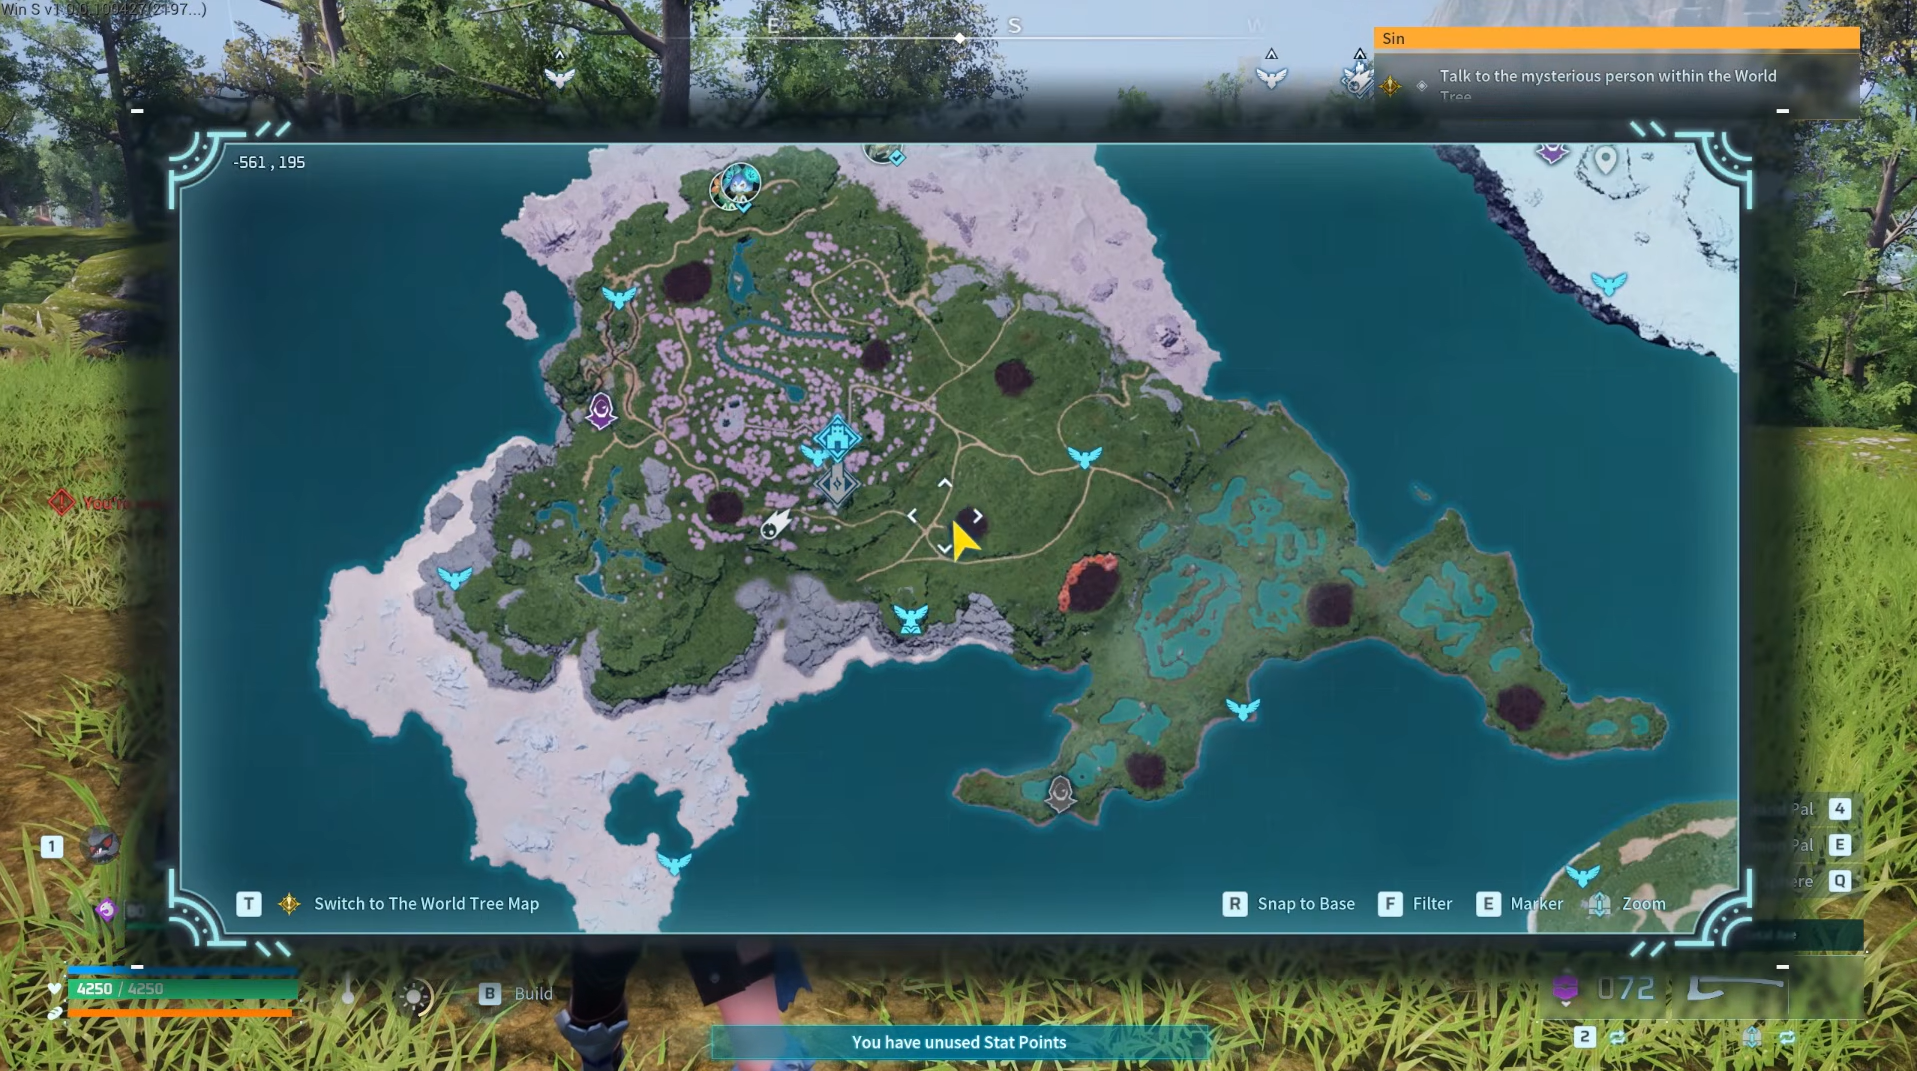
This is the definitive, undisputed king of endgame base locations in version 1.0. It is the absolute best spot for combining Ore, Coal, Sulfur, and Oil production into a single, massive mega-base.
-
Infinite Oil Extraction: The terrain fully supports the new High-Pressure Crude Oil Extractors, maximizing your passive industrial fuel output for modern plastics, ultimate Pal Spheres, and high-tech weaponry.
-
Endgame Resource Wealth: The perimeter features abundant Crude Oil nodes alongside dense patches of Hard Wood, perfectly streamlining your mega-mining and manufacturing loops.
-
Flawless Building Grid: It offers a massive, flat layout. This open space is crucial for preventing oversized endgame labor Pals from getting stuck or suffering sanity drops due to pathfinding bugs.
#2. Best Starter Bases (Early Game)
Because starting a fresh save file is highly recommended to experience the overhauled 1.0 leveling curve, your initial camp setup needs a careful balance of raw safety and basic progression resources.
-
Hill of Beginnings - South (Coordinates: 264, -548): An incredibly large, flat area rich in Ore and Paldium Fragments. It sits in close proximity to a low-level dungeon, giving you a continuous stream of early alpha experience, chest loot, and tech points.
-
Hill of Beginnings - North (Coordinates: 233, -488): A medium-sized construction zone featuring immediate access to Stone, Wood, and Paldium Fragments. It stands out due to its distinct natural chokepoints, allowing low-level players to effortlessly wall off and defend against early-game raids.
Early Game Ore Farming Outposts
If you need to rapidly spin up dedicated ore mining hubs during your first few hours, deploy a secondary satellite Palbox at one of these key locations:
-
Southwest of Small Settlement (Coordinates: 8, -528): A large, flat clearing packed with Ore and Wood. It is perfect for establishing an early automated mining colony.
-
West of Fort Ruins (Coordinates: 156, -396): A tighter, highly defensible base footprint holding seven static ore nodes.
-
Behind Desolate Church (Coordinates: 72, -400): A highly convenient medium-sized space situated right behind a permanent fast travel waypoint, entirely removing inventory weight travel stress.
#3. Mid to Late Game Specialized Outposts
As your progression curve scales toward industrial manufacturing, you will need dedicated resource camps to feed your high-tier automated assembly lines and weapon furnaces.
Ore & Sulfur Farming (Gunpowder Production)
-
South of Cinnamoth Forest (Coordinates: -77, -310): A prime location supplying large clusters of Ore, Sulfur, and vital minerals needed for bulk gunpowder crafting.
-
South of Foot of the Volcano (Coordinates: -341, -566): An alternative high-yield mineral zone for mass-producing high-tier munitions.
Coal Farming (Refined Ingot Hubs)
-
Near Sealed Realm of the Guardian (Coordinates: 180, -39): A sprawling deposit area for intensive Coal extraction. It is highly recommended to deploy advanced mining companions like Anubis here.
-
Mount Obsidian (Coordinates: -571, -648): Large, reliable coal veins nestled in the volcanic region. Ensure your characters equip high-tier heat-resistant armor when working these production lines.
Specialized Endgame Elements
-
Sulfur Base - West of Mount Obsidian (Coordinates: -744, -442): Extremely rich in concentrated Sulfur nodes, making it an ideal staging ground for ammunition stockpiling and strategic late-game defense.
-
Hexolite Quartz Base - West of Scorched Hill (Coordinates: -1340, -1285): Positioned right near a water source, this specialized camp provides a steady supply of Hexolite Quartz with medium structural space for your base blueprints.
#4. Aesthetic and Strategic 1.0 Locations
Version 1.0 expands options for players who want a beautiful home base layout without compromising on strategic safety or access to rare new materials.
-
Sun Reach Crystal Pool (Coordinates: -540, -1361): A gorgeous, flat layout surrounded by shallow water. Building here allows you to enjoy stunning scenery while safely avoiding the aggression zone of the nearby Jetragon world boss.
-
Sun Reach Soralite Cluster (Coordinates: 583, 144): A perfectly flat terrain that grants direct, unhindered access to the new Soralite Ore nodes introduced in the 1.0 update.
-
Flame Pulse Island (Coordinates: 788, 457): A massive, buildable volcanic island that is completely insulated and entirely safe from the local Pierdon world boss aggro radius.
-
Scouring Eyelet (Coordinates: 409, -693): A natural mountain fortress where sharp rock pillars and deep ravines create a raid-resistant environment that easily traps invading ground forces.
-
Foot of the World Tree (Coordinates: 841, 639): Gives you breathtaking lakeside jungle views right in front of the giant landmark. Setting up structures here requires you to unlock and craft the aquatic building kit to construct over-water platforms.
Hidden / Underground Base Options
For players looking for highly unique, secret layouts, version 1.0 features hidden base terrain:
-
Sandstone Gate Sinkhole (Coordinates: -1281, -633): A deeply recessed, underground sinkhole layout that is incredibly difficult for enemy raid pathing to infiltrate.
-
The Oasis (Coordinates: -259, -1398): A secluded, hidden base area boasting multiple secret exit paths for quick escape or tactical flanking.
-
Visual-First Scenic Hubs: Both the Half-Made Village (-266, -1492) and the Vertical Waterfall Zone (-220, -1498) combine unique pre-built environmental structures with beautiful aesthetic views, perfect for showcasing your ultimate Pal collections.
Best Tips for Choosing Base Locations in 1.0
-
Prioritize Open Topography: With the base limit raised to 50 Pals, any uneven ground will break worker AI. Prioritize flat surfaces, nearby resource nodes, and ample vertical clearance for large structures.
-
Defend the Perimeter: Cliffs, stone walls, and high-altitude vertical terrain are your best defense against 1.0 faction raids. Force enemies into narrow chokepoints where your automated defense turrets can wipe them out.
-
Run a Multi-Base Economy: Do not try to do everything in one spot. Maintain specialized bases across your 4 unlocked slots: a primary starter base, resource-specific outposts (Oil, Coal, Sulfur), and an aesthetic sky or water hub.
-
Utilize Modern Technologies: Version 1.0 introduces advanced mining technologies that reduce your day-to-day dependency on natural, static map nodes. This gives you much more freedom to choose base locations purely for aesthetic appeal or raid security, rather than just mining nodes.
Conclusion
For most efficient gameplay in Palworld 1.0, an unraidable ore peak (~190, -40) serves as the best main base due to resource cluster and safety. Sakurajima Oil Fields (-646, 270) is optimal for late-game resource extraction, while Sunreach Soralite Cluster (583, 144) covers critical endgame materials. Early and mid-game progression is best supported by Plateau of Beginnings, Desolate Church, and Verdant Brook, with secondary or aesthetic bases chosen according to play style, terrain preferences, and specialized resource goals.